Windows 7 Slow? Make it Fast!
Author:JasonD Webber
Windows 7 is really a pleasure to use, but it can be slow on some computers. Certainly not everyone can upgrade their computers to match an optimal Windows 7 configuration, and even top-end computers can run it slow too. Fret not, there are things you can do.
1. Switch off the Aero theme. It’s truly a waste, because Aero is what makes Windows 7 so nice to look at. However, some people don’t care much for the looks, but place their priority on performance. If this is you, you can turn off Aero by clicking on “Personalize” when you right-click on the Windows Desktop, and then choosing “Window Color”. While you’re at it, remember to turn off transparency there, then go to “Open classic appearance properties…”. By choosing another theme, Aero will be turned off. You will notice an almost immediate improvement in responsiveness.
2. Get rid of the sidebar. Personally I really dislike the sidebar, and always make it a point to remove it. Not only does it use up valuable computer resources and slows it down, it also makes my screen look cluttered. If you’re the same, feel free to do a right-click on the sidebar,” then choose Properties” and unselect “Start sidebar when Windows Starts”.
3. Get rid of unnecessary startup programs. Many software, when installed, place themselves into Windows’ startup list. This means that when Windows 7 starts up, these programs will load at the same time. This greatly increases the startup time and also uses up precious memory, slowing the computer down. To remove them, click on Start, and enter “msconfig” in the search field. Msconfig is a program that comes with Windows 7 that allows you to control what gets loaded when Windows starts.
4. Most important of all perhaps is the optimization of the Windows registry. The registry has a tendency to bloat and gets filled with invalid data after some time. Because of its importance, it is important to keep the registry optimized so as to have a good Windows performance. You can use a good registry cleaner software to do this. A registry cleaner a search the entire registry, fixing problems and optimizing it.
Saturday, July 30, 2011
Windows 7 is good
My Favorite Windows 7 Tips – So Far
Author:Richard Weston
I have been using Windows 7 Ultimate now for about 3 weeks on my main work computer, and so far, I love it. It’s fast, stable and has a lot of very cool new features. The new task bar is just great, it makes it real easy to switch between applications when you keep several open at once like I do. I have started to discover a few tips and tricks to help me get the most from Windows 7, and I thought I would share some of my favorites with you.
Problem Steps Recorder – Having no idea how to clearly describe what’s going on when your computer acts up to your support guru is frustrating, but Microsoft is willing to help. Windows 7 includes an excellent new solution in the Problem Steps Recorder.
When any application starts misbehaving under Windows 7 then all you need to do is click Start, type PSR and press Enter, then click Start Record. Work through whatever you’ve been doing and Problem Steps Recorder will record every click and key press, take screen grabs, and package everything up into a single zipped MHTML file when they’re finished, ready for emailing to your favorite geek. It’s quick, easy and effective, and will save you and your geek hours of troubleshooting time.
Switch to a projector – Windows 7 now provides a standard way to switch your display from one monitor to another, or a projector. Just press Win+ and choose your preferred display. (This will have no effect if you’ve only one display connected.) Especially handy when using a laptop to give a presentation.
Right-click everything – At first glance Windows 7 bears a striking resemblance to Vista, but there’s an easy way to begin spotting the differences – just right-click things. Right-click an empty part of the desktop, for instance, and you’ll find a menu entry to set your screen resolution. No need to go browsing through the display settings any more. Right-click the Explorer icon on the task bar for speedy access to common system folders: Documents, Pictures, the Windows folder, and more.
]]>
Minimize quickly with shake – If you have multiple windows open on your desktop and things are getting too cluttered, it used to be a time-consuming process to close them all down. In Windows 7 you can use the Aero Shake feature to minimise everything in seconds, using a cool mouse gesture. Grab the title bar of the window you wish to keep open and give it a shake, and rejoice in a clear desktop area.
Jump Lists – Right click on a program icon on your task bar, and it displays not only an open this program and unpin command, but a list of the most recent files opened in the program. Select one and it opens the program with that file open in one click. No more File, Open, Browse! The jump list for IE displays a list of the most often visited sites so you can open them in one click as well.
Create folder favorites – If you’re regularly working on the same folder in Explorer then select it in the right-hand page, right-click Favorites on the left-hand menu, and select Add to Favorites. It’ll then appear at the bottom of the favorites list for easy one-click access later.
Libraries – Another method of quickly browsing to specific places in your file structure are libraries. By default, Windows 7 comes with a documents, music, pictures and video library. You can create your own (like customers) by right clicking the left pane where it says Libraries and selecting New -> Library. Once there, right click the new library and select properties, include a folder and click OK. You may also add multiple folders to a library as well as optimize it for certain file types.
Window management – you can “dock” a window to the left or right half of the screen by simply dragging it to the edge; similarly, you can drag the window to the top of the screen to maximize it, and double-click the window top / bottom border to maximize it vertically with the same horizontal width. This is invaluable if you frequently have 2 documents open side by side while working (like I do). These actions are also available with keyboard shortcuts:
Win+Left Arrow and Win+Right Arrow dock;
Win+Up Arrow and Win+Down Arrow maximizes and restores / minimizes;
Win+Shift+Up Arrow and Win+Shift+Down Arrow maximizes and restores the vertical size.
This side-by-side docking feature is particularly invaluable on wide screen monitors – it makes the old Windows way of shift-clicking on two items in the task bar and then using the context menu to arrange them feel really painful.
These are some of the tips I’ve found most useful so far on my Windows 7 adventure. What are some tips you’ve discovered? Are you looking for an easier way to do something? Let me know and I’ll share them in a future article.
Friday, July 29, 2011
Top 20 Windows 7 Tips
Here are 20 tricks to tweak Windows 7 into the interface that works best for you.
Just got your hands on Windows 7 and want to bend it to your will? No problem. We've got plenty of tips, hacks and secrets to keep you busy for a long time, including automatically opening Windows Explorer to a folder of your choice, speeding up taskbar thumbnails, finding hidden desktop themes, forcing User Account Control to act the way you'd like, keeping your Explorer searches secret from others, and more.
So check out these tips. If you like them, we'll keep more coming.
General tips
We'll start with a few nifty tips that can make your desktop more interesting, make it easier to get around and increase your computer's power efficiency.
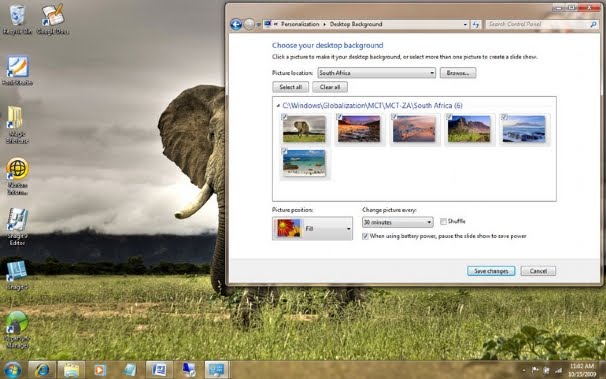
Use Hidden International Wallpapers and Themes
When you first install Windows 7, it asks for your language, time and currency. Based on your responses, it installs a set of wallpapers and themes. If you choose English (United States) for your time and currency format, for example, the available desktop backgrounds and themes will include a United States section with scenery from locations such as Maine, the Southwest and so on.
Hidden, though, are background scenery and themes from other English-speaking countries -- Australia, Canada, Great Britain and South Africa. Normally, you can't access those backgrounds or themes, but there is a simple way you can install and use them:
1. In the search box in the Start menu, type C:\Windows\Globalization\MCT and press Enter. (Note: If Windows 7 is installed in a drive other than C:, use that letter instead.)
2. Windows Explorer will launch and show you a list of subfolders under C:\Windows\Globalization\MCT: MCT-AU, MCT-CA, MCT-GB, MCT-US, and MCT-ZA. Each subfolder has wallpapers for a specific country: AU for Australia, CA for Canada, GB for Great Britain, US for the United States, and ZA for South Africa.
For any of the countries whose wallpaper and themes you want to use, go into its Theme folder, for example, C:\Windows\Globalization\MCT\MCT-ZA\Theme. Double-click the theme you see there (for example ZA).
3. That will install a shortcut to the theme and wallpapers in the Personalization section of Control Panel.
You can now use them as you would any other theme or background, by right-clicking the desktop, choosing Personalize, and choosing a background or theme. They will be listed in their own section.
Shake Your Desktop Free of Clutter
If you frequently run multiple programs simultaneously, your desktop can get extremely cluttered. This can get annoying if you're working on one program and want to minimize all the other windows -- in previous versions of Windows you had to minimize them individually.
With Windows 7's "shake" feature, though, you can minimize every window except the one in which you're currently working -- in a single step. Click and hold the title bar of the window you want to keep on the desktop; while still holding the title bar, shake it quickly back and forth until all of the other windows minimize to the taskbar. Then let go. To make them return, shake the title bar again.
You can accomplish the same thing by pressing the Window key-Home key combination -- although doing that is not nearly as much fun.
Get a Power Efficiency Report
Have a laptop and want to get more battery life out of it? Windows 7 includes a hidden built-in tool that will examine your laptop's energy use and make recommendations on how to improve it. To use it:
1. Run a command prompt as an administrator. To do this, type cmd in the search box, and when the cmd icon appears, right-click it and choose "Run as administrator."
2. At the command line, type in the following:
powercfg -energy -output \Folder\Energy_Report.html
where \Folder represents the folder where you want the report to be placed.
3. For about a minute, Windows 7 will examine the behavior of your laptop. It will then analyze it and create a report in HTML format in the folder you specified. Double-click the file, and you'll get a report -- follow its recommendations for ways to improve power performance.
Subscribe to:
Comments (Atom)